Friday, July 31, 2009

Day 21: A birthday dress

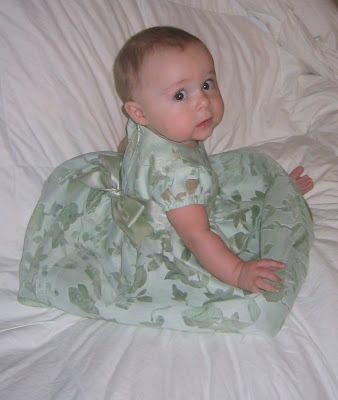
I found these fabrics in the clearance section during a sale for an extra 50% off, and I decided to make a beautiful birthday dress for Evie. (Plus the blue is a nice palate cleanser for me after a surfeit of pink.)


I love it when I can make fancy dresses for my girls for less than $10. I ended up only using half of what I thought I would, so this dress probably cost me about $7 or $8 when you figure in the cost of the thread, zipper, and pattern. I stock up on patterns when they are on sale for $0.99, it has saved me hundreds of dollars and I have an extensive library of patterns for everything from baby clothes to costumes. (Oh, that is a good tip. Buy the expensive costume patterns when they are on sale earlier in the year, instead of in October.)


I can't wait to see my two princesses dressed for the ball.

Wednesday, July 29, 2009

Day 20: The last doll clothes... that I will ever make! (possibly.)


I am really, really sick of sewing little, teenie, tiny seams. I am done. I refuse to sew anything for a doll. ever. again! (Or at least for six months.) Of course it all depends on how Evie likes them when she opens up her birthday presents. I spent hours making my son an alphabet quilt for his first birthday and he wouldn't even look at it when he opened it. I no longer quilt, if that tells you anything about me...

Tuesday, July 28, 2009

Day 19: My kind of magic...

One of my all time favorite Cinderella movies is The Slipper and the Rose. If you haven't seen it (and if you are a romantic at heart) you really should. I think that this is where my love of costumes and period clothing stems from. I remember watching it over and over with my mother, from the time I was maybe 4 or 5 years old. One of my favorite scenes is when the wicked step-mother tells Cinderella that they have been invited to the royal ball and she must take some of their old dress and "make three splendid new dresses" out of them. Poor Cinderella has no dress making skills and is feeling despair over her task when her Fairy Godmother shows up; and with some magic, and a keen fashion sense, saves the day. I don't know why, but that scene has been playing over and over in my head for the last two days as I transformed this pile of scraps...


... into a dress fit for my princess.


The green satin is literally the scraps I had left over from sewing a vest for my cousin Tiffany's husband, for their wedding last year. And the floral patterned fabric I found in my quest to organize my stash, a 1/2 yard can go quite far. Simple and pretty, I can't wait for church this week.

Day 18: Still in miniature...

But how sweet is this? This is the preemie sweater I mentioned yesterday, it's for a family friend who just had a 4 lb. baby girl...


One nice thing about knitting something this small, I started this sweater on Saturday night. Kind of instant gratification.

I feel like I have been sewing all day long with nothing to show for it. I got all my squares layered and sewn for the rag quilt, I spent almost an hour on a doll romper suit that ended up not working because of sleeves, and I am halfway through a dress for Lila that I can't wait to post about, but I've run out of the color of thread that I need and I also need to get a zipper for it. I keep ending up with all these half finished projects and thinking that one of these days I will be able to post 27 finished items. Ah well, the kids think they need to eat three times a day. It cuts into the crafting time.

Monday, July 27, 2009

Day 17: more doll clothes...

I am going to be dreaming in miniature if I don't finish these soon. They are pretty cute though, aren't they?


Of course it doesn't help that my knitting project is a preemie sized sweater. I am surrounded by tiny crafts! I may have to switch it up an make a dress or something tomorrow... just for a change of pace.

Saturday, July 25, 2009

Day 16: More birthday presents...

I was very sick on Friday. Crawl from couch-to-bed-to-bathtub-to-couch-again kind of sick. So I am going to consider the challenge paused for Friday and pick right up today. I cut out a bunch of doll clothes to make for Evie last Christmas, but they didn't fit the Cabbage Patch doll I was making them for. And they didn't fit any of her other dolls either. So they have set tucked away for the last seven months. A couple of weeks ago I found this doll at Dollar Tree and they actually fit her! Hooray! (Plus she even has a cute face, which usually the dolls at the dollar stores don't.)


So now I have a week in which to hurry up and sew! There will be a lot of girly projects for the next little while.

Thursday, July 23, 2009

Day 15: Monster Pants


Pretty self explanatory. You can't really tell from his expression, but he was quite happy with them. And Evie kept trying to try them on to prove that she is as big as Jake...


I also got most of the red and black skirt sewn up. I am loving my sewing room being all organized... I feel so productive!

Wednesday, July 22, 2009

Day 14: Too Sweet!

*Warning* This post is so sweet it may cause a toothache!

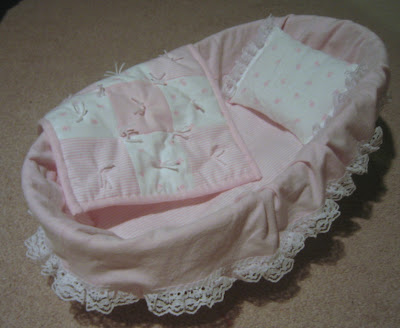
My little girl will be turning 3 in a couple of weeks. She has asked for a pink birthday. She wants to go to Build-a-Bear and make a pink bear and then go to a pink movie. (I am still trying to figure that one out.) Pink is obviously her favorite color, and she also loves to play with her baby dolls. So I found this basket at the DI for $1.50 and with some pink flannels from the remnant bin...


The perfect birthday present for a pink-loving, almost three year old!


The best part for me is that I probably spent less than $5 on materials and this ended up way cuter than anything I could have bought in the store. Plus it is one of a kind!

Days 12 and 13: The Very Big Project

Two days. That is how long it took to unearth all my fabric and yarn that were packed away in totes and boxes, and basically a big jumbled mess.


I sorted all my scraps of fabric by color and ended up with 11 totes that I can now look through quickly when working. Plus I think it sets a good perimeter on what I can keep. If it won't fit in the tote then I have to get rid of some. (That's the theory anyway...)


The drawers are now for my yarn storage and sorted by weight and style of yarn. I think 4 drawers of yarn should be enough for anybody, right?


And the big blue tote in the corner? Yeah. That is all my pieces of fabric that are a yard or more. I made a solemn vow not to buy any more fabric until I emptied that box by sewing my way through it... that vow lasted about 6 hours until I went to the fabric store with my cousin tonight and found a beautiful, butter yellow, fine gauge corduroy in the clearance rack. Hey, at least I am not addicted to crack or heroin...

Saturday, July 18, 2009

Day 11: Dead on my feet...

The "Very Big Project" continued today with a garage sale to free up storage space and make enough money to get the storage I want for my sewing room. It was a successful day, but due to insomnia and a baby wanting to eat at 4 a.m. I didn't sleep last night. By the time I got tired it was 5:30 and I needed to get up by 6 to set up the yard sale. And it was so stinking hot today! I got about an hour or an hour and a half nap after the sale, but I can barely type this post let alone try to work on any of my projects. So good night to all and I will hope to have something more interesting to share tomorrow.

Day 10: A very big project

I am determined to set my sewing room in order. To that end, today I spent sorting through my children's toy room and 14 totes (I am not exaggerating that at all, I counted them...) of baby and children's clothes for a yard sale tomorrow. I got down to 4 totes of clothes and cut down at least a fifth of the toys. I am hoping in a few more days to be able to post pictures of a clean, well-organized, creativity-inspiring sewing room. But with a project this big my other interests will have to take a back seat for a little while.

Thursday, July 16, 2009

Day 9: that stuff you never thought you'd use...

Yes, I am talking about math. Today my project was drafting out the plans for both a skirt and a baby quilt. Sewing is a lot like carpentry... measure twice, cut once. If you take the time to plan everything out on paper it makes for smoother sailing later on. So I knew that I wanted to make the baby quilt 36 inches by 48 inches, and I knew that my finished squares would be 4 inches on each side. So using that math drummed into my head by the public school system I figured out that I would need 108 squares. But... this is a rag quilt, which means that each square is comprised of 3 layers. So that means 8 yards of fabric cut into 324 individual squares. More than 4 hours later and this...


becomes this...


Not bad for a day's work if I say so myself. (The black and red fabrics on the right are going to be my skirt. I am quite excited to make it, I don't sew for myself very often.) And an added bonus, my kids love when I am cutting out projects. They love to play with the scraps. It never ceases to amaze me that even with a play room full of toys, they will spend hours playing with little pieces of fabric.


Wednesday, July 15, 2009

Day 8: an even shorter post...


Today the most I could do was finish the purple shorts, that did mean loading three kids into the car and going to the store for a spool of purple thread... okay, I'll quit whining.

I also did quite a bit of knitting and I made homemade cookies. From scratch. Yeah, you wish I was your mom.

Tuesday, July 14, 2009

Day 7: a short post


I am feeling thwarted by the sewing gods. I ran out of purple thread with 2 seams to go, arrrgh!! But I finished the teal ones so I am counting those for today. Again, a simple project that I cut out probably close to a year ago and then has sat in my to do pile. I am glad to be done with them... almost.

Monday, July 13, 2009

Day 6: a clever fix...

I found this cute ballerina fabric in the remnant bin at JoAnn's awhile ago. "Just enough to make Evie a pair of pajama pants!" I thought, and you really can't beat getting a pair of pants for under $2.


But after I washed the fabric and got it on grain, there was only enough fabric if I cut the leg a little too short. So I did thinking I would make them into capris. But I was only a smidgen too short! Not even a full inch! Arrgh!! Then I had a brilliant thought. I bought some satin blanket binding and sewed it on instead of hemming the pant legs. Adorably cute, and if I hadn't told you otherwise you would have thought it was just a design decision I had made... right?

Sunday, July 12, 2009

Day 5: KIP Bag

KIP: Knitting In Progress. A very cool lady, who I met at the knitting group I go to, designed this awesome bag which is perfect for a small portable project...like socks! Ever since I saw her and her daughter's bags I have been wanting to make one. So today I did!


And when I say cool I mean works-in-a-dress-shop, sews-weddings-gowns, wears-50's-style-vintage and red-lipstick kind of cool... Okay, maybe you have to be "sew" geeky like me to appreciate that, but she is awesome! Thanks for the pattern, Tracy!

I also hemmed a few more pairs of ruined pants into summer shorts...


Another hint about this is that if the hole has gotten too big and makes it so you can't hem them without making them too short, you can cut the pant leg off as close to the hole as possible and then just sew a line of stitching around the leg at about 1/4" seam. The edge will fray, but no farther than the stitching. If these were for a girl you could sew lace or a ruffle of fabric on for added length... but I don't think my son would appreciate that!


Close up detail to show the difference between the rolled hem and the frayed hem.

Saturday, July 11, 2009

Day 4: from the mending pile...


This is probably self explanatory, but my project today was to turn some of Jake's old school pants that he wore a hole into the knee into some shorts for summer. It's also great for when they suddenly shoot up an inch or two so their pants still fit around the waist but are all floods at the ankles. A nice way to stretch that clothing budget.


And if you take the time to match your thread to the top stitching already on the pants no one will ever know they weren't shorts to begin with! (...and can I take a minute to pat myself on the back? Today has been so crazy I haven't had a minute to sneak down to the sewing room until 11 pm. I was almost going to throw in the towel but having this challenge has really motivated me! So a 10 minute mending job and Jake has more shorts for the summer, win-win.)

Friday, July 10, 2009

Day 3: Child's Tea Party Apron Tutorial...

Today I made another little tea party apron (for my other niece, since I missed her birthday in May...) and since I got a nice comment on the last post that someone else would like to make one, I thought I would do an actual tutorial on how I make them. *Disclaimer*: I have never done this before and since I tend to be a visual learner I took a ton of pictures. I just hope that my directions make sense.


First things first: fabric requirements... (this project is a great use for fat quarters.) One fabric for the apron, pockets, and ties. And a contrast fabric for the waistband, applique, and bias edgings. A small amount of lightweight fusible web for the applique.

apron: 8" by 21"
pocket: 5" by 21"
ties: at least 2" by 20" (You can make them wider if you want a larger bow, or even substitute ribbon for fabric ties.)
waistband: 3" by 10"
bias edging: 2" strips cut by putting the fabric on grain and then cutting at a 45 degree angle across it.


You line your bias strips up, right sides together, and stitch across.


Then you trim the angled edge off.


Press the seams open.


Fold in half lengthwise and press. (Be very generous with your steam setting, it will make it easier for the fabric to retain the folds.)


What it should look like after pressing, a distinct fold.


Fold each side into the center and press.


Fold in half lengthwise again and press. Your 2" strip will now be 1/2" wide. Now we move on to the applique.


Take a small square of fusible web and iron on to the contrast fabric, then draw a simple shape (like a heart or star) and cut out. I like the child-like look I get by drawing free hand (I never claimed to be an artist...) but you could also trace a shape or monogram using a template.


Peel off the paper backing and place on the pocket and iron in place.


Make sure that you don't place it where you will be stitching the pocket sections!


Now you will stitch around the shape using a zig-zag stitch. (It is helpful if you haven't done this before to play around on a scrap of fabric trying different stitch lengths and widths to find the look you like best.)


I like a satin stitch look, which I get by having a fairly wide with to the "zig" and a tiny length to the "zag".


Now we add the bias tape we made earlier to the top of the pocket section. Simply slide the pocket piece into the fold of the bias tape with the ends being even. You can pin the bias tape in place if you like, but because it is sewing a straight line I usually don't have any trouble sliding the piece in as I go.


You want to stitch as close to the edge of the bias tape as you can, while making sure you are catching it in the back too.


Now we will measure and draw a stitching line for our pockets. I made these pieces 21" so that I would end up with 3 evenly spaced pockets. You can be as creative as you want here, you could make one large pocket and two smaller ones, or add a couple of narrower "slots" to hold a pencil or wooden spoon. You just have to take the time to do the math and figure out where you want the pockets to open. Also, you don't want to go too large or they may just gape open, but you could always add a button or snap or piece of velcro if that happened.


Here you can see the stitching line I've drawn. On dark fabrics a white dress maker's pencil or chalk works wonderful, I am using a disappearing marker here since the white wouldn't show up on the yellow very well.


Next I add pins an inch or so away from my lines on each side to keep the pocket from moving around on the apron while I sew it place.


What is should look like after sewing the lines for the pockets.


Now we cut two strips of bias tape for the sides and stitch in place like we did for the top of the pocket, making sure this time to catch both the apron and the pocket fabric in the fold of the bias tape.


Yea! It's almost a pocket.


Last step of the pockets is to sew the bias tape along the bottom edge. You'll want to add an extra 1/2" or so to each end of the bias tape.


Then trim the corner at an angle, like this.


Then fold to the inside and press so that when you sew the bias tape along the bottom you will end up with a nice finished edge on the sides.


Next we'll make the ties, fold the strip in half lengthwise and sew with a 1/4" seam allowance down the long edge and one of the short ends. Then clip your corner at an angle, making sure not to cut your stitching!


That way when you turn the tie right side out you will have a nice clean corner on the finished edge.


Press 1/2" seam allowance on both short ends of the waistband. Gather the top of the apron and pin it to the waistband, matching the centers and ends, and easing the gather along the rest. Pin the right side of the waist band to the wrong side of the apron and sew with a 1/2" seam allowance.


Once you have stitched it in place and removed your gathering stitches you will press the waist band up and then press a 1/2" seam allowance along the top.


Fold the waistband over to the stitching line and pin in place. Then stitch close to edge of the waist band.


Now take the unfinished end of the tie and insert it in the opening at the side of the waistband. (If you choose to use a wider tie or ribbon simply make a pleat in it so it will fit the opening.)


Then stitch the ends of the waistband shut and your ties are attached.


And voila! An adorable apron any little girl will love for tea parties or helping Mommy cook dinner. I hope this was somewhat clearer than mud, but if you have any questions feel free to leave them as a comment.