Monday, July 30, 2012

Week #5: Let's Hear it for the Boys!

So I first have to say that I know these pictures are not good. My original plan was to finish in time to go "on location" and show them in action, actually fishing. But there were two problems with that plan.

1. I couldn't figure out quite how to hide the fact that Brian is in a wheelchair which would have been a pretty big give away.

2. Um... I finished them at 10 pm the day they were due.

It was crazy! I got up at 9 am, went to the bathroom, threw on some clothes and then went downstairs and sewed like a mad woman for the next 13 hours, not even stopping for a bathroom break! (I didn't mean to, I just realized that was what had happened when I finally made a mad dash upstairs... ah, the things we do for our art...) The only thing that made this possible was my sister, Caite. She came down and took care of my kids, made us breakfast and lunch, and became my sous-seamstress! She cut out pieces and pinned stuff and kept me sane. :)

Father and Son Fishing Vests


Jake was rocking the store mannequin pose. "Hey Mom, how about I look off in the distance like I'm contemplating life?"

I really wanted to make something special for my "boys" this week. My husband is an avid fly-fisherman and our son is finally old enough to be a good buddy to go with on fishing trips. (As in, he'll actually sit and fish  instead of trying to jump into the river..) My husband was in need of a new fishing vest as his old one was falling apart, so I designed them matching vests.


The vests are constructed from a light cotton twill and lined with cotton so they will be lightweight and comfortable to wear. The pockets and yokes are made from rip stop nylon for strength and durability. The dad vest has a zipper pocket in the front lined with nylon to hold his phone and wallet, things you definitely don't want to lose or get wet. The patch pockets are mitered at the corners to allow them to expand out for greater capacity, and all the pocket flaps have Velcro closures for easy access. The patches on the top pockets are made of the cuddle fleece that people usually use in blankets, the fuzzy texture makes a great surface to hold flies.


The dad vest also has a large zipper pocket that is almost the size of the entire back. Useful for holding maps, gloves, even an extra shirt once the sun comes up and the temperature rises. The D-rings in the back can be used to clip a net to while fishing, and then to hang the vest from at home. 


My boys were thrilled with how the vests turned out and can't wait to go fishing in them!

Monday, July 23, 2012

Week 4: Ombre

Whoo... that was a close one. I squeaked by in 5th place. But the upshot is that I squeaked by and am moving on to week 5: Boy themed crafts.  I have to admit, I was feeling pretty confident about my crafting this week... until I saw the other entries! This competition is getting fiercer every week...
You really ought to take a look, there are some pretty crafty ideas.

SYTYC 

Of course, I'm hoping that you'll vote for mine. :)

Ombre Dyed Silk Cowl

This week's theme has been the most fun! I started out by dying some fabric for a skirt.


What you'll need to dye, minus the clothespins. They did not end up serving any useful purpose...


My first attempt:
Or, what I did wrong...

1. I used too much dye. The whole bottle in fact. I wanted to make sure I got a vibrant color, but I know now that I could have gotten the same color without washing half the bottle down the drain. 


2. I attempted to rig up a system to lower the fabric slowly in sections. (Notice the aforementioned clothes pins?) Yeah... did not work. I think for this to be successful you'd need to be able to have your fabric be spread completely flat so that you would get straight lines. My tub of dye wasn't big enough, and I wasn't about to fill up my whole bathtub with dye. It was also awkward to get the pole out at the end, since I wanted all the fabric to be dyed, and not left white. 


3. I really loved the colors I got at first. What I did not take into account was how much more dye would be washed out when I ran it through a cycle to set the color in my washing machine. I learned to dye it darker than I want the finished product to be. (i.e. I should have left it to set longer in the dye bath.)


Okay, let's be honest. Wearing a skirt made out of this a person would end up looking like a giant candy corn...

The lines between the different shades didn't come out as straight as I wanted, but the color was gorgeous and the dyeing process had me hooked!


I quickly went out and bought a few (ahem, five) more colors and started dying every piece of white clothing I could get my hands on. 


$9 dress from Wal-mart, now I won't look like a giant marshmallow...

A dress, some tee shirts, my daughter's stained cardigan. I even dyed some shirts for my son. Just plain, not ombre. (Because he's a boy and he looked at me like I was crazy when I suggested it.)  I was seriously debating whether or not my husband would wear ombre colored socks, when I stumbled across a bolt of antique silk that I was given by my grandmother years ago. It's almost 65 years old and has yellowed with age, but I thought that I would try to dye some of it and see what I got.


My lines still aren't perfectly straight, but they are getting better. And yes, the color looks really off here because I have fluorescent lights in my laundry room.

It came out so beautifully. I took three yards of the silk and dyed it in three concentrations.


 After I set the color and the fabric dried I cut it in half and then into 8 1/2" strips. I sewed two strips together, matching light to dark on both ends, with a french seam. Then I did as small of a rolled hem as I could on both long edges.


The silk is so light and airy it's a perfect summer accessory, and the pink is a great punch of fresh color.


Ombre dying isn't difficult, but it does take some playing around to find the techniques that work best for you. And be forewarned, once you start dying you may not be able to stop!


I did another piece of silk in a teal color. This time I went for a much subtler gradient of color. I dyed this piece in 5 minute increments, so the darkest part sat in the dye bath for over half an hour while the lightest part only sat for 5 minutes. 


So pretty. 


Monday, July 16, 2012

Week #3: Summer Bounty

I finished in 2nd place again last week, which I was very happy about.

Summer Bounty Picnic Basket

Summer Bounty makes me think of delicious foods, warm weather, and a more relaxed schedule with my children. One of our favorite summertime activities is picnicking, so I sewed a liner for a laundry basket and turned it into a great picnic basket instead!

I picked up a square laundry basket at Walmart for around $6. I think it's a perfect size to allow for a good sized picnic without becoming too heavy once it's packed up with all the food. I also made sure to get one with comfortable and sturdy handles. 


I used duck cloth and outdoor canvas for the fabrics of the liner because I wanted something that would hold up to a lot of use. The top of the liner has a drawstring cord so that I don't have to worry about things falling out in the car, and ties in each corner to keep it from shifting around the basket. But it's still detachable if it needed to be taken out and cleaned.

The top can fold completely over the edge of the basket allowing for easy access to the inside. There are six pockets around the insides so you can keep things neatly organized. 

My plan is to keep the basket all stocked and ready to go so that I could be ready to picnic in matter of minutes. Throw some sandwiches together, add in some fruit and chips and we're off!
I think it's impressive that in the basket I have paper plates, plastic knives, forks and spoons, salt and pepper, garbage bags (large and small), wipes, tissues, paper towels, hand sanitizer, sunscreen, bug repellent, a note pad, pencil, and a deck of cards, and there is still a ton of room for food, and even a blanket if you wanted. This picnic basket could go to the park, the mountains, the beach, or even on a car trip. We're ready for any adventure!

I used this basket twice within a week of finishing it, and I love it. On our outing to the Golden Spike visitors center last weekend,  I literally realized we needed to take something for lunch on our way out the door. So I grabbed the basket and threw in a loaf of bread, the jars of peanut butter and honey, a package of goldfish, and a Tupperware container of grapes. It took me less than two minutes to be out the door and we had everything we needed to pull of a successful car picnic! I spent the entire lunch pointing out to my family how cool it was how perfectly my idea worked! Finally my husband responded with the proper enthusiasm... so I shut up. :) But dudes! It is just so cool to be able to feed your children and have it take two minutes to be ready to go! I know this basket is going to get a lot of use over the rest of the summer and in years to come... 


Friday, July 6, 2012

Week 2: Repurposing

I made it through week 2 and finished in 2nd place! I am very happy with that.

So did you guess this one was mine? I kind of thought if you knew me at all it wouldn't be too hard to pick out. But seriously? I knit a 68" long lace wrap in two weeks! And only pulled one all-nighter to finish it, that's kind of crazy awesome....


For those of you who were wondering that is Caitlin modeling it for me. I have such a cute sister.

Sweater to Lace Wrap

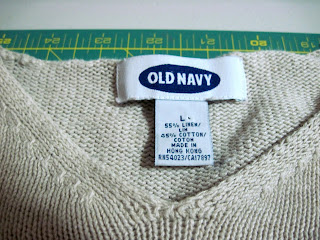
I found a sweater at the thrift store for three dollars. It was a men's large cotton/linen blend with a stain on the front. I thought I would just work around the stained part, but when I brought it home and washed it the stain came right out. Bonus! 


So you can get an idea of the size of sweater I was working with. I didn't love the color when I bought it, I thought it was pretty blah and I would dye it or something. Or if I couldn't get the stain out dye would have helped cover it...


A close up of the fiber content. I think this technique would work great for cottons and linens, but I would be wary of wool. I would just be afraid of being able to wash it well enough with out felting the sweater in the process. 


I unpicked the seams and then unraveled each piece.

A note for anyone interested in trying this. The #1 thing you have to be aware of to pull it apart is how the sweater is constructed. (I wish I'd thought to get a picture of the seams before I unpicked them.) If they are serged it won't work, because a serger cuts as it sews and you'll just end up with a pile of individual strings. 


This is where I started to fall in love with the neutral color of the ecru and how it looked in the pattern.

I used the yarn to knit a lace wrap. This wrap is a perfect size for summer when you need something light to throw around your shoulders in a movie theater or at church where they have the air conditioning cranked a little too high. It is also thin enough to be worn as a scarf or cowl. The cotton/linen blend yarn gave a beautiful stitch definition. 


Next time you browse the racks at the thrift store try looking past the boring or boxy sweaters to the yarn underneath! You can get a lot of yarn for very little money. 

So basically this awesome accessory cost me somewhere around $1.50, because I easily have enough yarn left over to knit another one. Talk about bang for your buck!


Thursday, July 5, 2012

Go figure...

You'd think with weekly projects due on SYTYC that would be just about all I could accomplish, but I guess it's kicked my creative juices into overdrive or something because I am on fire today! :) 


I sewed two pairs of pajama pants for Jake, a pajama outfit for Evie, hemmed two pairs of pants into shorts for Jake, and put new elastic into the waistband of a pair of dress up pants. 


All things that have been hanging around in the mending basket for awhile.


 It's the sewing version of clearing out your inbox!


Monday, July 2, 2012

My Scrappy project entry and on to week #2

Did you guess my Scrappy Project was the Kindle Cover?

Well you were right! :)

I actually made it for Caitlin. I got a nice red leather cover with my Kindle for Christmas, but she's had her Kindle Fire (which is why my Kindle pictured about doesn't fit quite right, it was made to the Kindle Fire measurements.) since her birthday in March and no cover.

She was thrilled when I gave it to her and it makes me happy to see it being put to good use. I thought it was funny, when I was trying to type up the description I wanted to add that it was very tactile-ly pleasing. To feel the different fabrics and run your fingers over the stitches. But then I thought that maybe sounded just a bit creepy, so I left it out. The first thing Caite said when I gave it to her and she put her Kindle in it? "Oooh, this is very tactile-ly pleasing!"  I swear! The exact same made up word! I guess that sort of thing is genetic... 

Thank you to everyone who voted for me and helped me make it through to week #2. 


Or Upcycled, or whatever you want to call it. I had the most fun with this project and would love it if you voted for me!