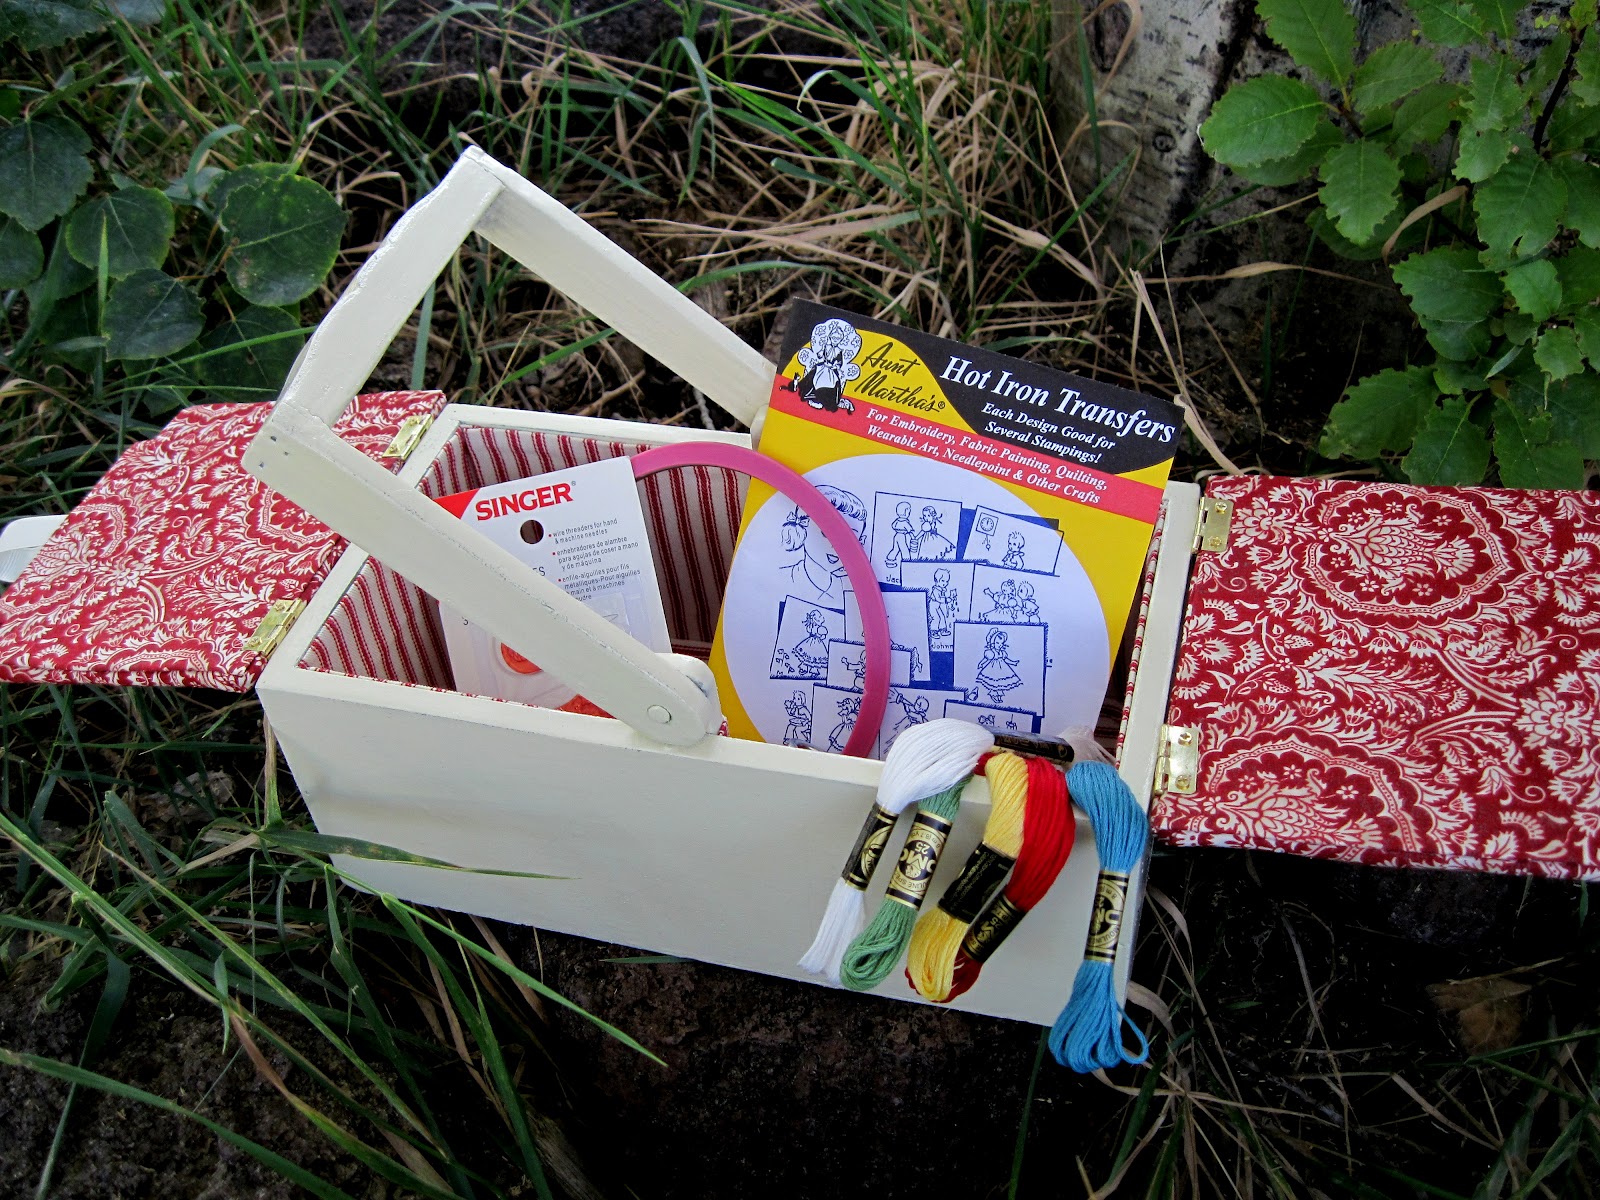
Evie's Sewing Box
I'm really extra proud of this week's craft. It took me way out of my comfort zone, and it still came out better than I had hoped it would! I got an idea of making a sewing basket for Evie for her birthday, along with embroidery lessons. She's been begging me for months to teach her. I had been browsing the D.I. for months and never found a basket in good enough condition that had the characteristics I was looking for. The week before her birthday I happened to be out by a Savers and took the opportunity to check there.
Et voila! The perfect box. It had a handle, wasn't too big, and was in fairly decent shape. And it was $1.99! Sold.
First step out my comfort zone. Anything to do with paint. I really, really dislike painting. Rooms, furniture, watercolors... there is no type of painting on this earth that I like to do. It takes forever, and there are so many steps that I am sure to mess something up. So... what follows is simply an explanation of what I did, and should not in any way be taken as the right or proper way to paint something.
First thing I did was to lightly sand the entire box. Not enough to expose the wood, but just to rough up the surface and give the new paint something to stick to.
There was a little bit of water damage on one side, so the bottom was starting to pull away, and one corner that had been chipped off. I used wood glue to fill the crack and strengthen the bottom, and then wood filler to smooth out the broken corner and the side. Like I said before, I have no idea if that is the right way to do a repair, but because it was so minor I took a chance and it seems to have worked okay.
A coat of primer. This was mostly to check if I had sanded the filler smooth enough and to make sure the paint would go on evenly.
The next day and a half was spent in spray painting. I could only do one side at a time, so that the paint wouldn't run. I gave the whole piece two or three coats. And once I was happy with the coverage of the ivory I used a clear sealing spray which gave it a nice shiny finish and will hopefully help it hold up to the wear and tear of belonging to a child.
The lids are cut out of a piece of chip board that I had left over from an Ikea purchase. It was perfect, not too thick, but strong and sturdy.
Second major step out of my comfort zone, power tools. I unfortunately don't have any pictures of cutting the lids, because I don't have any power tools. I had to go over to my dad's house to use his, and by the time I'd gathered all my materials and plans I'm lucky I only forgot to take the camera and not one of my children. I honestly don't know who was more nervous about me using the power tools, me or my dad. After I explained what I was trying to accomplish, he took over the cutting out of the lids. I did use the drill for the holes myself though! :)
The holes are to allow the lid to be tufted.
Using spray adhesive I covered each lid with two layers of batting cut to the same size as the lid, and then a piece of fabric cut larger so that the ends could wrap around the lid.
I tufted the lid by sewing covered buttons in place with heavy duty upholstery thread and pulling them tightly through on the back.
From the front.
I folded the edges, pulling tightly and mitering the corners, tacking them in place with hot glue.
For the lining I carefully measured each side and then added 1/4" allowance to be turned under.
Using hot glue I tacked the top in place first so it would lay nice and flush with the top edge, then slowly and carefully tacked along the sides and corners of the box with glue and stretched the fabric into place.
For the bottom I cut a piece of heavy duty interfacing to just fit and then used the spray adhesive to cover it with the fabric and turn under the edges.
Then hot glued it in place in the bottom of the box.
I used the same technique to make the covers for the bottom of the lids.
I hot glued a loop of ribbon for a handle before gluing the bottom cover in place. I took the time to add a little extra glue to each corner and make sure they were securely joined along all the edges.
I found these hinges at Michael's for .99 for a bag of two! I wasn't sure if they would work, but I grabbed a screwdriver and just went for it. I attached them to the outside of the box and the underside of the lid.
When the first side was on and neatly opening and closing I jumped up from my chair and did a little happy dance! I was so thrilled that it worked exactly the way I'd envisioned.
A perfect sized sewing box for my newly turned six year old.
Hinged lids that open and close.
(Seriously, I'm still so thrilled at how cool that is!)
Ready for our stitching lessons.
She was absolutely thrilled with her gift and has already started working on her first project.
She can often be found sitting next to me in the living room happily sewing. In fact today I thought it was too cute for words, she climbed up on her daddy's lap and said, "I can teach you how to embroider Daddy, I know all about it now."