Wednesday, October 20, 2010

My knitting nook...

About a month or so ago, my husband came to me and said in a very serious tone of voice, "Chrissy. I think we need to resign ourselves to the fact that yarn and knitting things are just going to be a part of our living room.  So maybe we should think about getting some shelving or something to contain all your... stuff." 

I assume that when he said "we need to resign ourselves" he was actually talking about himself. I already knew that knitting paraphernalia was a permanent fixture in our living room.... 

And to be fair I know that I needed to be more organized than my sewing basket would allow.  So I was thrilled at the green light to start looking for something to house it all in.

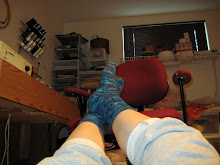
When I am in the middle of a couple of projects or serious crafting time, like getting ready for Christmas, more often than not my front room looks like this.


Piles and baskets everywhere and me often frustrated that although I know I own at least 6 tape measures and literally hundreds of needles, I can never find one when I need it!


The sad little basket (the one half buried in half-knitted sweaters, not the one filled with books) that I out grew  a year and a half ago.


The couch that my children aren't allowed to sit on at times because I am spread from one end to the other... that and they like to poke my double-points into the seat cushions.  So naughty!

But now....


TA-DA!
I am in love with my newly organized knitting shelf!


Bins to hold the various WIPs, easy access to all my pattern books, and even room for the odd embroidery or cross-stitched project that might jump into the queue.


I even found a fun glass to store my crochet hooks and the stray needle or pair of scissors that may need a home for a minute or two. It says "sirop de citron" on it and it makes me feel all eclectic and designer-y.


I am so excited to have my very own knitting storage that I will probably even put all my projects away before I go to bed at night! 

...at least til' the new wears off.


Monday, October 11, 2010

Because sometimes you just feel a little "crabby"...

So I knit a crab.  Isn't he adorable? 
He, and the pajama pants he is sitting on, are for my nephew's birthday. 
(Not that a 2 year old would be reading my craft blog... but just in case, cover his eyes Elena!)


Happy Birthday Huck! We wish we could be there to share the day... or at least the cake. :)

Wednesday, October 6, 2010

Halloween Decorations

The last time I decorated for Halloween my son was five months old.  He's now a 2nd grader.  It's been awhile. 

 It is hard to decorate when you are living in an apartment and all your decorations are parked across town in a storage unit.  You have to really want to decorate to make that work.  

This will be our third Halloween in our home and what with one thing and another I was too lazy to put forth any great effort at putting up Halloween decorations.  But now that my son is 7... well, it was important to him this year.  So I hauled out the tote of  fall decor, blew the dust off it and was excited to find I actually already had quite a bit more then I remembered.  

But I also started working early enough that I finished some projects I've been meaning to get around for the past several years.


This was the tutorial that was posted the first time I visited Ucreate and I fell in love with it immediately. I had very good intentions, but every time I remembered that I wanted to make it was already half way through October and I would think, "Next year for sure!"


I am especially proud of the fact that I free hand cut everything but the orange squares on this puppy! (I did those with a rotary cutter and mat.) I also decided that for the amount of work that was going into it I wanted to make sure that it would last, so I embroidered around each shape, sewed on buttons and then added another backing square of felt to hide the stitching and make it more durable.


My kids have enjoyed watching me work on each square and today we picked out the cute skeleton guy (you can see him sticking out of #6 on the top picture) for our marker.  I just hope they'll be good about taking turns each day.


This project was also the Create With Me September project @ Ucreate.


Mine came out rather square, but I actually like that because one of our favorite Halloween books is "The Legend of Spookley the Square Pumpkin".


Our basket of holiday books and a teddy to snuggle up with and read one.

#3- Lighting:

This was my sister's idea, and I can't remember where she said she saw it. But it is so awesomely simple.  One strand of lights and one package of the mini cupcake liners that come in so many fun holiday themes.  Poke a tiny hole in the middle of the wrapper and pop your light through.  


It only costs a couple of dollars and you can change to Thanksgiving without having to completely dismantle your mantle! :)

#4- My dollar store wreath:


Less then $10 for all the materials. I just picked out some fall leaves in colors I liked and some sunflowers because they are so happy.  Then whacked them on to a cheap wreath base with some hot glue.  The scarecrow is actually not attached to the wreath, but just to the storm door behind it.  That way I can change the accent if I ever get bored with it with out having to make a whole new wreath...  clever, huh?
not really... just an afterthought. :)

#5-  My awesome new sign.

This was a gift from my dad and sister who have a wicked sense of humor.*


*It's funny to us because my husband became handicapped about four years ago and now walks with the aid of forearm crutches.  Hey, if you can't laugh at your life then what's the point?

I didn't want it to be lost in my ridiculously messy flower beds so I got a plastic trick or treating cauldron, filled it with gravel so it won't blow over, and stuck the sign and the leaves into a piece of styrofoam. 

It's been fun having our decorations up and getting us into the Halloween spirit.  I am glad this is a tradition that's being rekindled at our home. It feels good to make some magic for my children.

Tuesday, October 5, 2010

My "A Place for Everything and Everything in It's Place" Purse...


A couple of weeks ago I was looking for a Halloween Advent Calendar tutorial because I'd been to the craft store to get something to finish one of my Christmas projects and I'd seen these adorable Halloween buttons and remembered that I wanted to make a Halloween Advent Calendar, and somehow I ended up reading about the purse week challenge instead.  So with reckless abandon (and a slight twinge of guilt) I left my sewing room floor covered with fabric, felt and buttons and started drafting my ideal purse. (My crafting ADD  is being addressed with the help of my sister who is very good at scheduling other people's time and drew me up a color coded calendar with due dates for each project.  I'm also considering looking for a twelve-step program.... Crafter's Anonymous anyone?)

I started by writing down everything I have to and want to have with me at any given time.  There was the obvious like wallet, cell phone, keys, sunglasses, toiletries, and diapers and wipes for my baby.  Then I decided to take it a step further and incorporate a knitting bag into my purse. I am an avid knitter and frequently am carrying two or three bags when I leave the house. My purse, a diaper bag and my knitting bag.   I decided that my ideal purse would combine all three of these, but not look like I was heading out for a weekend get away. 


The outer fabric is a mossy green suede cloth which gave it a nice texture without being too fussy and should hold up well for everyday use. I also went for simple and clean lines and tried to pay attention to details like using heavy duty interfacing to help it support the amount of stuff I haul around, and the handles are lined with 2" nylon webbing for strength and durability. There is a magnetic snap on each section so I don't risk losing all my little knitting paraphernalia every time I get into my purse.


But inside is luxurious and pretty enough to satisfy my girly heart.  I had a remnant of this gorgeous heavy silk brocade that I have been hanging on to for awhile because I couldn't bear to cut into it.  I am thrilled that I ended up using it in a project for myself, I hardly ever make anything for myself.


2/3 Purse: 1/3 Knitting Bag

On the purse side there is a zippered inner pocket for make-up, tissues, and all the other toiletries a girl has to have. A row of little pockets for my phone, my sunglasses, and gum. Also a large pocket with elastic in the top to keep it from gaping open to hold diapers and wipes.  When my last baby is out of diapers it will be the perfect size for a book or note book.  And then the rest of the purse perfectly fits my wallet and coupon organizer.  


The knitting bag side is the perfect size to hold a small to medium sized project. The middle divider has four small pockets to hold things like stitch markers, needles, a tape measure, and I even added a ribbon "scissors leash" to make sure they couldn't fall out if the bag got tipped over.


I also added a zippered pocket to the back of the purse to hold snacks. Always a good idea if you are leaving your house with your kids for more than 10 minutes. 

I am really pleased with how it turned out.  
If you'd like to you can click here to see all the other purses people made for this challenge.

I decided to try out for this contest as well, I think it sounds like a really fun idea to be creative with someone else's input.


Sunday, October 3, 2010

My Sewing Machine


This is my sewing machine.  
It's a Bernina. 
 It's old and doesn't do anything fancy, but I wouldn't trade it for anything.

Last week while neck deep in my whole Christmas Crafting extravaganza it died and refused to sew another stitch.  I called my dad and he came to take a look at it, and he said he would take it to the repair shop and see if it could be fixed.  I cried.  Mostly because I was worried that it couldn't be fixed.  "What's the big deal?" you might be wondering, "So get a newer model that does all kinds of embroidery stitches and sews by it's self and makes dinner while you're sewing...."  

The big deal is that my dad built this sewing machine for my mom when they were first married, and he was working as a sewing machine mechanic. I remember sitting on the floor playing with my mom's button jar while she sewed with it.  I was endlessly fascinated by this complex thing that made clothes, and when I was 8 or so I tried to figure out how to work it by myself and about destroyed it in the process.  Good thing my dad knew a thing or two about sewing machines...

I learned how to sew in Jr. High and from that time on my mom turned over her machine and any and all sewing to me. I took all the sewing classes offered in high school and got my own serger for Christmas when I was 16. My graduation present was my sewing cabinet that holds both my machines.  

I sewed my wedding dress on this machine. I sewed three blessing outfits for my three beautiful babies.  I've sewn any number of gifts for my family and friends over the past 20 years that were made with love, tears, and the occasional drop of blood in them.  It is the one thing I own that most represents who I am in this world.  I am a seamstress.  I love that I can take a flat piece of fabric and turn it into a three dimensional item that will bring warmth and comfort to the people I love.  Nothing could replace the memories I have of this machine in my life and of the connection I feel to my mother every time I sit down in front of it and create something.  I am so grateful to my parents for recognizing and nurturing a talent in me that maybe wasn't as overt as the preforming abilities of my artistic and talented siblings.

And I am very grateful to my Dad for taking my machine and getting it fixed.  

Because I really don't know what I would do without it...